길 잃은 라쿤이 돌아왔다. 어디까지 갔다온건지 soul 이 U Seminar 다녀온 느낌이랄까… 원래 목표는 한 주를 마치는 금요일날 가까스로 클래스를 통한 시뮬레이션을 마치고, 주말에는 비동기와 woker threads 같은(?)걸 재빨리 공부해서 응당 thread 처럼 작동하게끔 해볼 작정이였는데, 아주 그럴싸한 계획이 되고 말았다.
Process 와 Thread 작동원리 시뮬레이션 해보기
1. Process simulator (Single Thread)
우선 Process 에 대해서 이해한대로 표현해보자면 흔히 내가 사용하는 카카오톡 은 내가 터지해주기 전까지는 Program 에 지나지 않았으나 내가 터지하는 순간 Process 가 된다.
Process 의 코드들은 먼길 떠나서 배웠던 방식으로 메모리에 얹혀지고, 우리의 영특한 CPU 께서 이 코드를 매우 빠르게 처리해준다.
이 과정에서 Process 를 fork 한 child threads 가 생겨나고, 녀석들이 각자의 일을 처리하고 돌아올 때까지 parent 는 child 를 기다리게 된다. process memory 의 stack 영역에서 RET 를 생각하니 이해가 조금 더 수월했다.

$ the real reason to not use sigkill
이런 짤도 있었는데, sysAdmin 이라거나 sigKill 에 대해서 잘 모르면서도 재미가 있다. 얼핏보기에 프로세스 강제종료 같은거 시키면 자식 스레드는 부모를 못만나고 사망하게 된다는 슬픈이야기 같다. ‘미안하다 그 동안의 스레드들아… 너희들은 이번 기회에 내게 충분히 갚아줬다…’
1. Process 생성
공부하면서 떠오르는 생각으로는 모든
Process는 하나 이상의thread를 가지므로single thread로 먼저 구현해보고,multi threads는 기존의Process를extends하는 방식으로 해볼까 하는 계획을 세웠다.1 2 3 4 5 6 7 8
class Process { constructor(name, second, elapsed = 0, current = status.READY) { this.name = name; this.second = second; this.elapsed = elapsed; this.current = current; } }
Processclass생성constructorPID역할을 해줄name
Process사이즈를 대신할second- 현재 처리 경과를 보여줄
elpased
- 현재 처리 경과를 보여줄
PC로 상태관리를 해줄current
2. Queue 생성
queue라는걸 머리 속으로 생각은 이미했지만 실제로 구현하려니 생각보다 쉽지 않았다.1 2 3 4 5 6 7 8
class Queue { constructor(processList) { this.processList = processList; this.queue = null; this.count = 0; this.keepGoing = true; } }
Queueclass생성constructor- 실행할
Process를list로 받아서queue에processList로 담는다. count로 처리 완료시간을 보여줄 예정keepGoing은 조금 꼼수처럼 됐지만 마지막에setTimeOut으로exec할 때,process를 마쳤음에도 불구하고 계속 실행되는걸 막으려고boolean을 달아놨다.
- 실행할
3. Process Life Cycle
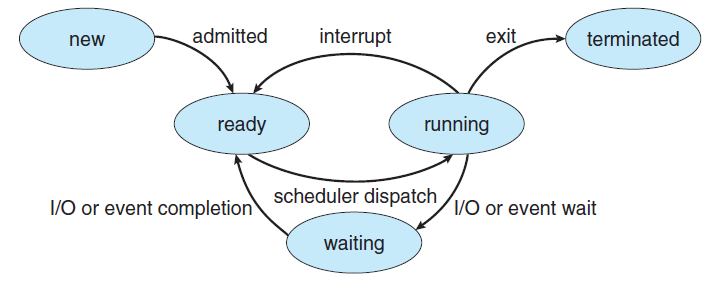
구현해보고나니 좀 이해가 가는데 처음 이 그림을 보고 있을땐 너무 막막했다.
1
2
3
4
5
6
7
8
9
10
11
12
13
14
15
16
17
18
19
20
21
22
23
24
25
26
27
28
29
30
31
32
33
34
35
36
37
38
39
40
41
42
43
44
45
46
47
48
49
50
51
52
53
54
class Queue {
  constructor(processList) {
    this.processList = processList;
    this.queue = null;
    this.count = 0;
    this.keepGoing = true;
  }

  initializing() {
    for (const key of this.processList) {
      key.current = status.WAITING;
    }
    this.queue = this.processList[0];
    this.print();
  }

  nextQue() {
    if (this.isTerminated()) {
      this.queue.current = status.TERMINATED;
    }

    if (this.queue.current === status.RUNNING) {
      this.queue.current = status.WAITING;
    }

    let terminated = this.processList.filter((el) => el.current === status.TERMINATED);
    let waiting = this.processList.filter((el) => el.current === status.WAITING);
    let elapsed = waiting.filter((el) => el.elapsed < this.queue.elapsed);

    if (terminated.length === this.processList.length) {
      this.print();
      this.keepGoing = false;
      return this.printExit();
    }
    if (elapsed.length === 0) {
      this.queue = waiting[0];
    } else if (elapsed.length === 0 && waiting.length === 0) {
      this.queue = this.queue;
    } else {
      this.queue = elapsed[0];
    }
  }

  processExecutor() {
    this.queue.elapsed++;
    this.queue.current = status.RUNNING;
    this.print();
    this.nextQue();
  }

  isTerminated() {
    return this.queue.elapsed === this.queue.second;
  }
}
- 그림에 따라서
process life cycle을Queue의method로 구현해봤다. initializing: 생성된prcoess는Queue에 들어올 때,current가ready에서waiting으로 바뀌고, 첫 번째process가queue에 담긴다.processExcutor:queue에 들어온prcess를 실행하고,print해준 뒤,nextQue로 보낸다.nextQue: 다음queue를 잡아준다.- 이 부분이 가장 시간을 많이 잡아먹었다.
- 함수 종료조건과 스트림 함수를 더 연습해야 될 것 같다.
nextQue에서 다음 큐를 잡는 조건isTermintaed:terminated된process가 있으면queue에서 제외 시킨다.queue에runnning인 상태가 있으면wainting시켜준다.terminated인 상태를filter로 걸러서process의 개수와 같으면excutor를 종료시킨다.waiting인 상태를filter로 걸러서elapsed가queue보다 작은process를 다음queue에 담아준다.- 사실 이 부분을
waiting인 상태 중에elapsed가 가장 작은process를 다음queue에 담는 조건으로 수정하고 싶었는데 수정을 못했다. - 그래서
process가 3개 뿐이고,single thread를 사용할 때는process가 차곡차곡 순서대로 실행되지만thread의 개수가 달라지면 일정process가 먼저 실행되는 현상이 발생한다.
- 사실 이 부분을
- 한 개의
process만 남겨두고 다른 모든process가terminated되면running인 상태의process를queue에 담아 작업을 마쳐준다.
- 그림에 따라서
2. Process simulator (Multi Threads)
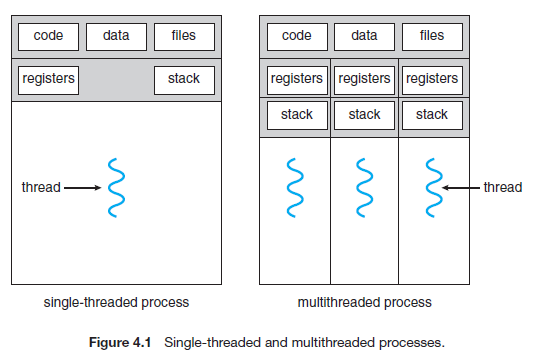
Thread 의 첫인상은 지렁이다. 이유는 모르겠지만 인터넷에 있는 거의 모든 thread 에 대한 설명이 지렁이 모양으로 나와있다. 이 친구의 특징은
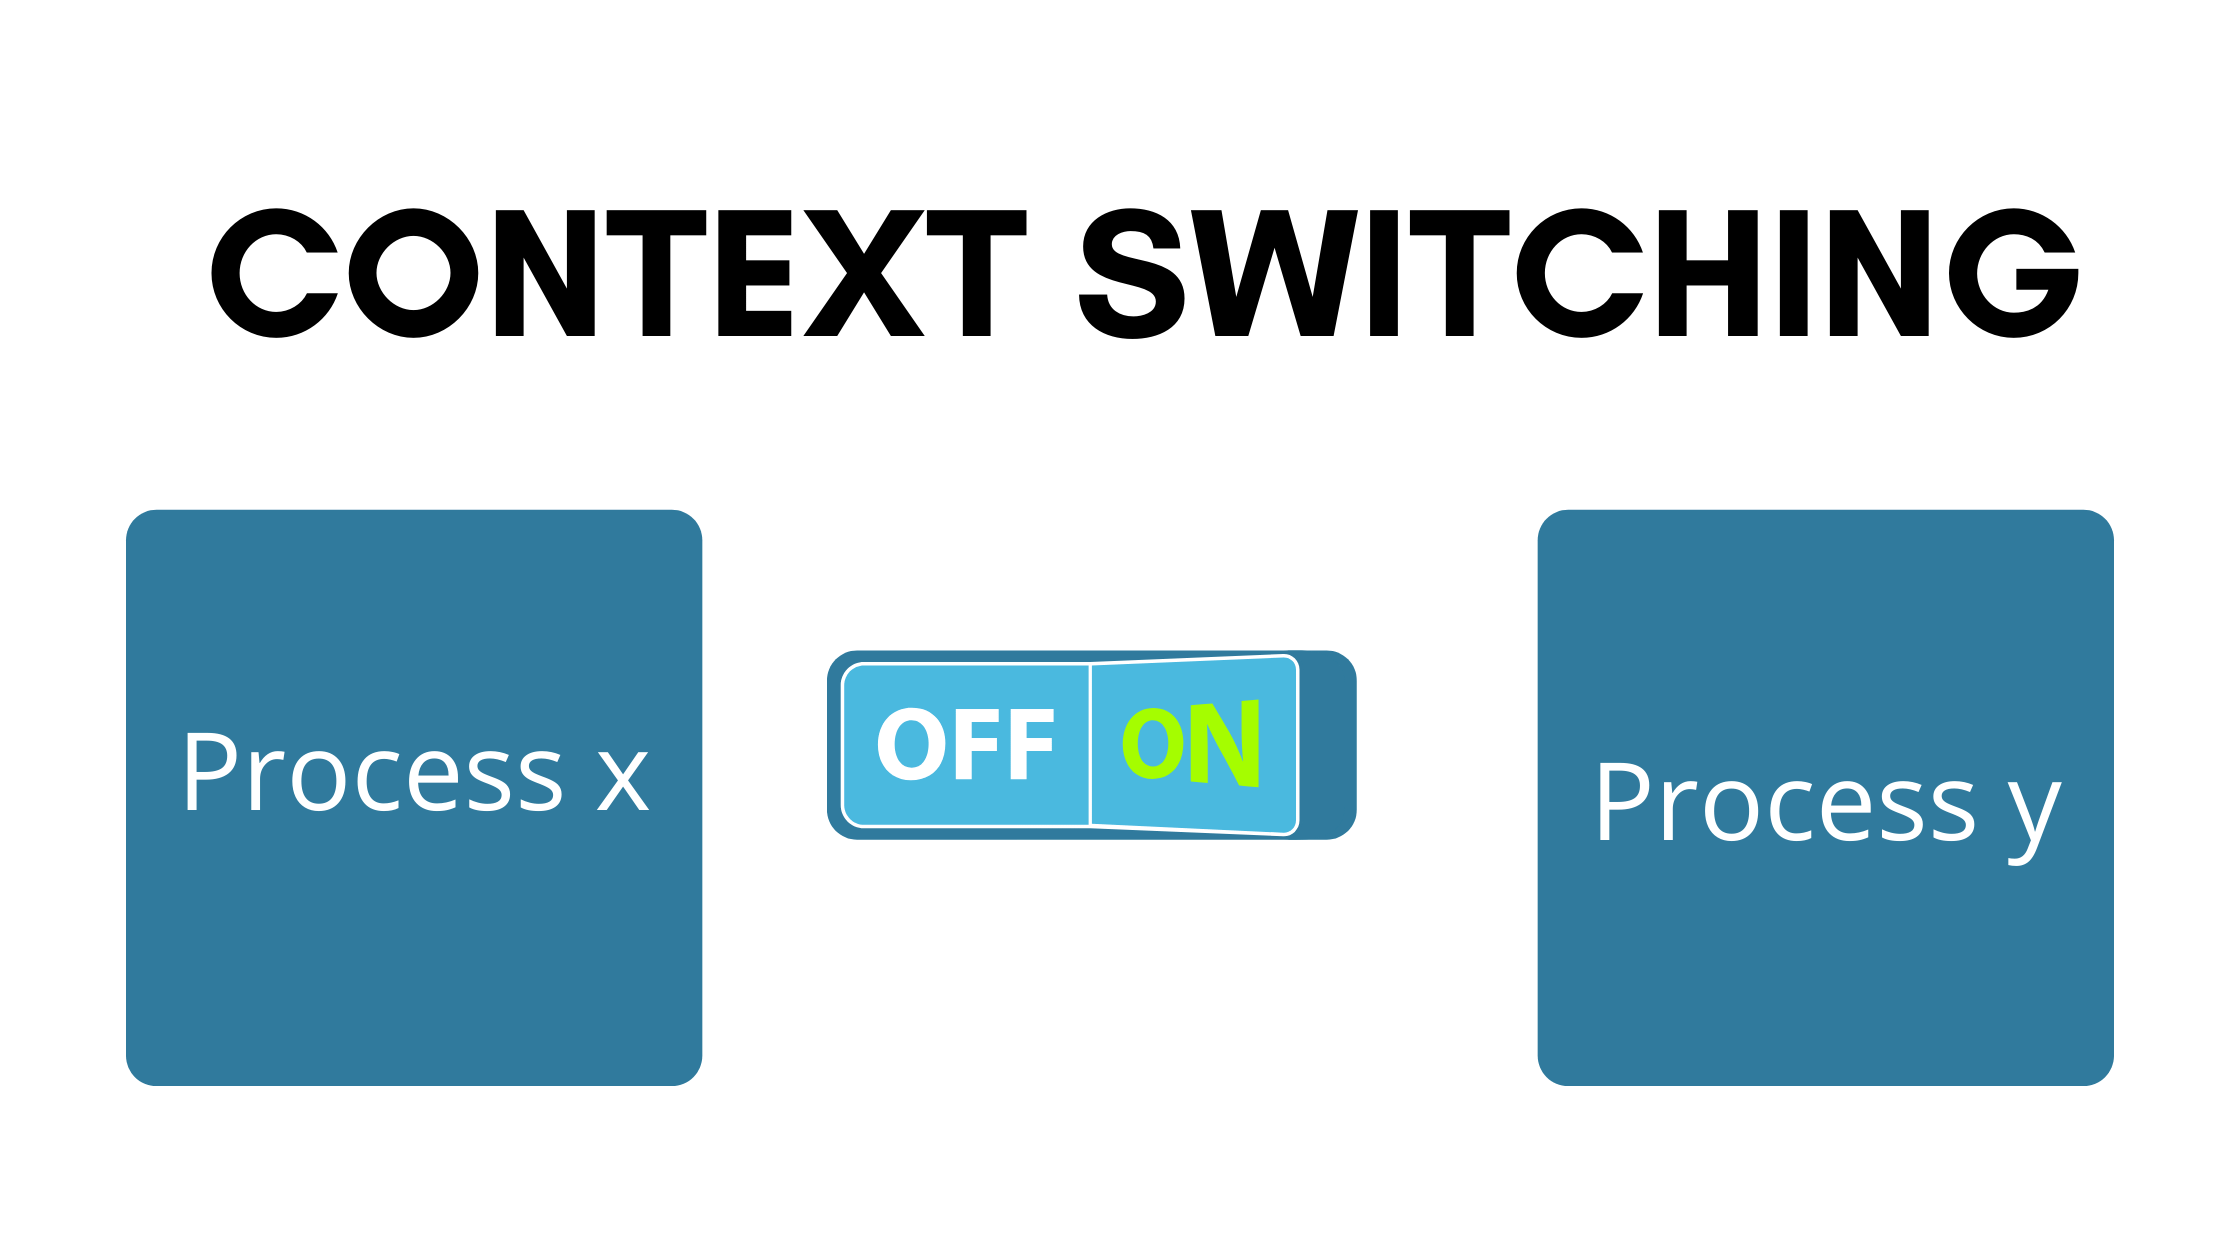
Process안에서 태어난다.Process간의context switching은 비용이 비싸다.
그러니까 이것 또한 내가 이해한대로 표현해보자면 영특한
CPU라도core개수가 한 개라면 한 가지 일 밖에 할 수가 없다. 그래서process는 각각의thread를 긴밀하게switching하게되는데, 얼마전에register따라 갔다가 봤던processmemory중stack영역을 제외한 나머지 부분을thread끼리 공유한채로,process가 요리조리thread를 바꿔가며 실행하게 된다.따라서
thread는process에 비해context switching비용이 싸다.
- 장황한 이해가 된 것 같은데, 이번 시뮬레이션의 포인트를
process와thread의 전반적인 작동 방식에 대해 이해하고,multi threads를 통해process실행 시간의 단축을 눈으로 확인(?) 해보는 것으로 했다.- (인텔의
hyper threading은 인텔 주가가 다시 회복되면 정리해볼까… 한꺼번에 너무 다양한걸 얇고깊고넓게 학습해서 양이 너무 많다 ㅠㅠ)
1. Thread 생성
시뮬레이션도 시뮬레이션이지만
class자체도 생소하고,extends를 써봐야겠다는 생각에 좀 재미있었다.이번에는
super를 사용하는 것도 성공했다구.multi threads구현에는 처리 시간의 비교를 위한 약간의 조건이 들어갔는데,process총 처리 시간을 2로 나눴을 때의 몫이thread의 개수가 된다.process는 기본적으로 하나 이상의thread를 가지니까 생성된thraed의 개수에 한 개를 더해야 하는가에 대한 조정이 필요한데 일단 시뮬레이션이 목적이니 생성된thread의 개수를process가 가지는thread의 개수로 하기로 했다.1 2 3 4 5 6
class Thread extends Process { constructor(name, second) { super(name, second); this.thread = 1; } }
- 일단 하고싶었던대로
Process를 상속해서Thread를 생성했다.- 사실 이 녀석은
multi threads를 가진process니까 이름을 달리해줬어야 할 것 같은 느낌이 지금에서야 든다.
- 사실 이 녀석은
contructor에 기본적으로thread를 하나 가질 수 있도록 설정은 해놓았지만 의미는 없다.
- 일단 하고싶었던대로
2. ThreadQue 생성
1
2
3
4
5
6
7
8
9
10
11
   class ThreadQueue extends Queue {
     threadExecutor() {
       this.queue.elapsed += this.queue.thread;
       if (this.queue.elapsed > this.queue.second) {
         this.queue.elapsed = this.queue.second;
       }
       this.queue.current = status.RUNNING;
       this.print();
       this.nextQue();
     }
   }
Queue를extends해서ThreadQueue를 생성했다. 단지method를 바꿔줘야 했다.threadExcutor라는method를 작성해서elapsed를 각Process가 가진thread의 개수만큼 올라갈 수 있도록 바꿔줬다.
3. Exec Process
1
2
3
4
5
6
7
8
9
10
11
12
13
14
15
16
17
18
19
20
21
22
23
24
25
// ================= create process ================
const currentProcessList = Random.createList(4);
const currentExecProcessList = Random.execList(currentProcessList);

// =================== print =======================
Print.currentInfo(currentProcessList);
Print.execListInfo(currentExecProcessList);

// ===================== Que =======================
const queue = new Queue(currentExecProcessList);

function run() {
  function exec() {
    queue.processExecutor();
    if (queue.keepGoing) {
      setTimeout(exec, 1000);
    }
  }

  queue.initializing();

  exec();
}

run();
- 기본적으로
Single Thread에서는 4개의Process를 생성하고, 그 중에 3개를 랜덤하게 뽑아서 실행시킨다. run에서는exec함수를 작성해서processExcutor를setTimeOut을 통해recursion으로 작성해봤다.- 사실
setTimeOut에 대한 공포감이 있었는데, 이게 성공되서 너무 기뻤다. setInterval도 재밌는 친구였다.- 빨리 비동기에 대해서 공부 할 것 (체크)…
- 사실
4.Compare result
같은 Process 를 3개씩 생성하고, single thread 와 multi threads 로 비교해봤다.
1. Single Thread

- 24초 걸렸다.
2. Multi Threads
- 8초 걸렸다.
5. 정리
- 좀 많이 돌아오느라
node module에서 구현해보지 못한게 아쉽다. thread의context switching하는 부분까지 자세하게 할 수 있는 방법이 없을까 고민해봤는데, 여기까지 하는걸로도 주말이 홀랑 지나갔다.- 마음을 좀 가다듬어야 할 것 같다. ㅠㅠ